Gimp Walk Through
Custom Page
Here is a little extra help with Gimp. I hope this helps you. Make sure to click on the tool back image to get more help familiarizing yourself with the tool. This is the most important part of Gimp!
The Tool Box
The GIMP uses a lot of windows for different things.
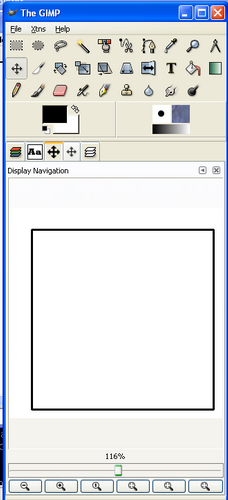
The most important window is the one labeled ``The GIMP'', which we will be calling ``the toolbox'' Shown in the picter If your toolbox looks different you might want to use the Help menu to make sure you are using The GIMP 2.2
On this window you'll find the main menu, which you can use to
perform operations such as creating a new image, opening an existing file, taking a screenshot or terminating The GIMP's execution.
Right bellow the menu you can see a table with some buttons for
the different tools (hence the name ``the toolbox'') that you can use on an image. I'll explain each tool individually latter.
You can also select the active foreground and background colors
in this window. In this example, black is set as the foreground color and white as the background color. You can swap the foreground and background colors or reset them to black and white clicking on the areas highlighted in the following shot. The buttons in the toolbox are associated to tools you can apply
to your image.
That, my friend, is the toolbox.
Exmples
This is what is known as the "tool box" the area that holds all of your tools you will need to make you image. If yours dosne't look like this don't freak out. The tools and there functions havn't changed just the look of the tool box. This is version 2.2!
Color Selection
You can double click on the buttons in the toolbox that show the
foreground and background colors to change them. If you do so, the Color Selection window will be displayed. The tabs at the upper right position allow you to use different
widgets to select the color:
Notice the ``Html Notation'' portion shown in Pictuer 2? It
displays the current color encoded in the standard representation
for colors in HTML files, which can be very useful if you are into
web development. You can cancel or accept your selection by using the Cancel and
OK buttons respectively. If you want to restore the previously
selected color without closing the color selection dialog, you can
use the ``Revert to old color'' button

CLICK TOOL BOX FOR MORE INFO!!!!
Don't know what each tool is for. Click on the"tool box" above to learn the names and uses for each tool.
Layers
Now use the menu (in the toolbox dialog) to create a new image
(File -> New). The image creation dialog will popup, asking you
some parameters about the image you want to create:
Useful predefined templates for standard image types are
provided. You can select one of them using the ``From Template''
list. I will later teach you how to modify the templates and add
your own.
You can also manually specify the parameters for your image.
First you can specify its size in pixels. The portrait/landscape
buttons just swap the height and the width. As you can see, the
amount of memory required for keeping the image loaded is also
shown.
(Layers)---
The GIMP uses layers to simplify the edition of images. You can
think of your image as a stack of ordered layers. Each layer can
have transparent see-through pixels, that show the contents of the
layers on the bottom, as well as solid pixels, which hide the bottom
layers.
Use the image menu to bring up the layers dialog (Dialogs ->
Layers) in the image where you added some text:
As you can see, our image has two layers. The top layer was
created by The GIMP when we added our text and the bottom layer,
``Background'', was created when we created the image.
The currently selected layer is highlighted. Its size is shown
in the image dialog using yellow and black lines. If you select
your text layer, you will see those lines surrounding the text.
You can click on the little eye icon to hide a given layer. The
image will be updated without the layer next to the eye you clicked.
If you hide your text layer, you will see nothing but the background
(and the yellow and black lines indicating the size of the current layer).
The buttons on the bottom of the layers dialog will let you edit
the properties (the name) for the currently selected layer, create a
new layer and raise, lower, duplicate, anchor and delete the
currently selected layer.
Right clicking on a layer will bring up a menu with even more
operations to be performed on a layer. Just in case this isn't
enough, you can also find these options in the Layers menu in the
image dialog.
I recommend you actually read the menu options for layers, most
should be self explanatory (or will become self explanatory as you
advance in this tutorial).
You can move the layers individually. Select the ``Move Layers &
Selections'' tool in the toolbox: Once this tool is selected you can drag your layers around.
Click in your text and drag it to whatever position you want. It is easy to miss the text and drag the background instead; undo might come in handy if you happen to do so.
Once all your text is shown, right click on its layer and use the
``Layer to imagesize'' menu option. Assuming that the layer is
smaller than the image, new transparent areas will be added causing
it to cover the entire image.
Create a new layer (by using the buttons at the bottom of the
layers dialog or right clicking on a layer in the layers dialog and
selecting the ``New Layer'' option). The ``Create a New Layer''
dialog will be shown. You are prompted for the properties for the new layer. By
default, the width and height will be those of your image (so the
layer will fill the entire image region). Make sure the layer fill
type is ``Transparent'' to create an entirely see-through layer.
Once you are done, click OK. Your layers dialog should look
similar to this. In general, I advise you to keep creating multiple layers for all
the different ``objects'' that make up your image. Try not to stack
multiple objects in the same layer: since many tools in The GIMP can
be applied to individual layers, keeping multiple things in the same
layer will make it difficult to modify them separately. Plus you might do somthing you don't like to one thing and you can always delet that layer by itself.
Second you can specify the image's resolution. I hardly ever touch those values, but you might find them handy.
You can create either a RGB or a Grayscale image. RGB images use
8 bytes per pixel and allow full color. Grayscale images only use 4
bytes per pixel but only allow black and white images.
Finally you can specify the initial contents with which the image
will be initially drawn: foreground and background use the current
colors shown in the toolbox; transparent, what I tend to use mostly,
leaves the image transparent.
More on Color Selection
Hint: The black and white squares under the colors in used reset the colors to black and white again!
